Contents
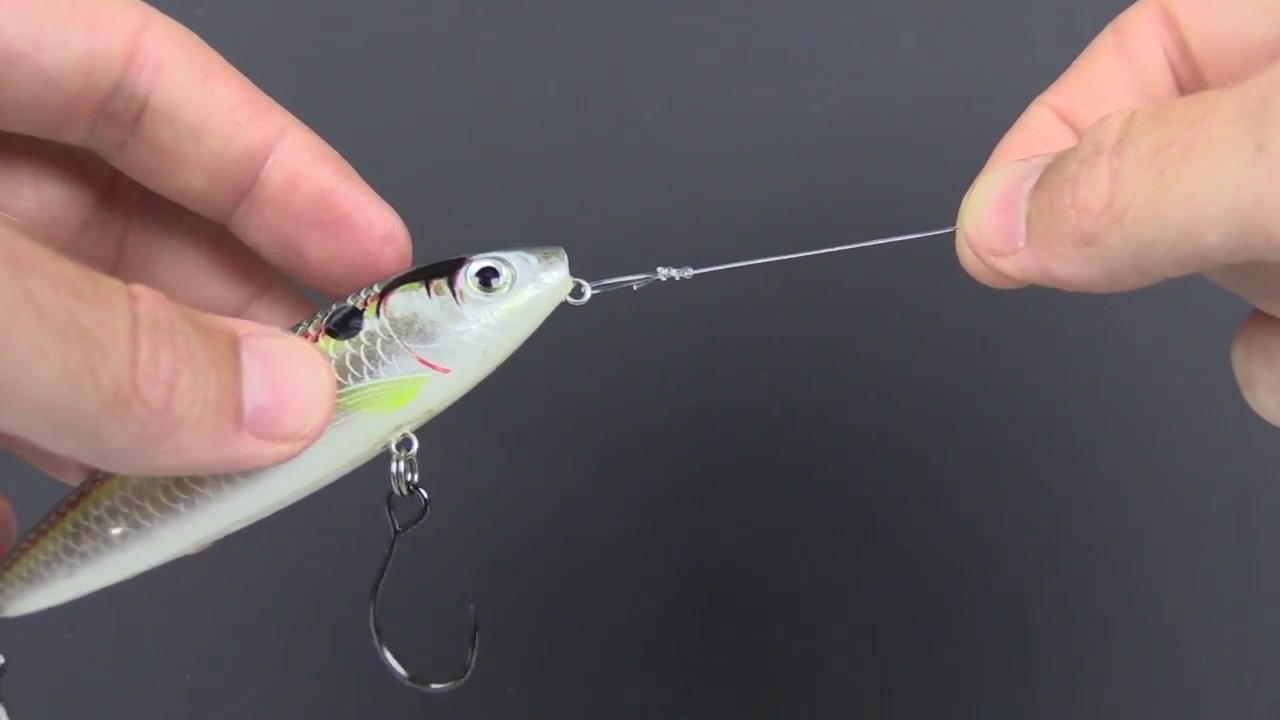
Learning to tie a fishing knot is an essential skill for any angler because it will be your advantage to catch the fish effectively. Otherwise, you probably deal with losing the hook many times, especially when the fish is biting.
Therefore, “How to tie a fishing knot?” might be a significant concern to many angles. Not a problem because you will assuredly acquire helpful information and detailed steps to be proficient at this skill after reading this article.
Things You Need Before Tying The Fishing Knot
Undoubtedly, there are various fishing knots for you to follow according to your desire or skills. However, no matter which one you intend to learn, make sure you have prepared the right vital things below to tackle fishing knot:
Fishing Lines
The high-quality fishing lines certainly contribute to the effectiveness of tying the knot, especially the strength aspect, because the lines might lose up a lot of strength at the knot after tying.
However, you don’t need to research more. Instead, you can pick 3 well-known options like mono, fluorocarbon, and braided lines. These lines have impressive features regarding stretch and strength, which support you to tie the knot effortlessly. Admittedly, each fishing line will vary according to some appropriate fishing knot methods.
Fishing hook
Buying a fishing hook might require you to consider different elements, for instance, size, sharpness, bend, and so forth. But, in the realm of fishing knot, the eye hook is critical to take into account.
Generally, straight, turned-up, turned-down eye hooks are 3 popular types you often see. It is desirable to use a straight-eye hook because it is appropriate for all fishing lines and tying methods. Meanwhile, turn-down or turn-up eye one is only compatible with fluorocarbon or mono lines to go through the eye and wrap up around the sank effectively.
Besides, if you use a lure or other tackle, be mindful of the eye hook feature accordingly.
5 Efficient Methods To Tie The Fishing Knot
This post will deliver you the top 5 popular and easy fishing knot methods with detailed steps to follow. Let’s explore now!
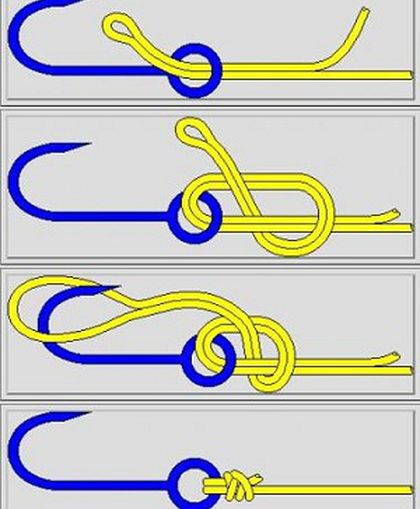
Palomar knot
Regarding the strongest and easy-to-tie knot, the Palomar knot is worthy of consideration, especially for beginners. Generally, this knot is compatible with braided or mono lines for tying the hook or lure.
Here are some simple steps to excel the Palomar knot:
- Step 1: Double the line (around 6-inch in length) to make the loop and pass it through the hook eye.
- Step 2: Create the overhand knot with that doubled line. Make sure to leave the loop large enough and avoid twisting the fishing line.
- Step 3: Pull the loop down to go through entirely the hook or lure.
- Step 4: Pull the rest of the fishing line to draw up the knot. Don’t forget to trim the extra length at the knot as well.
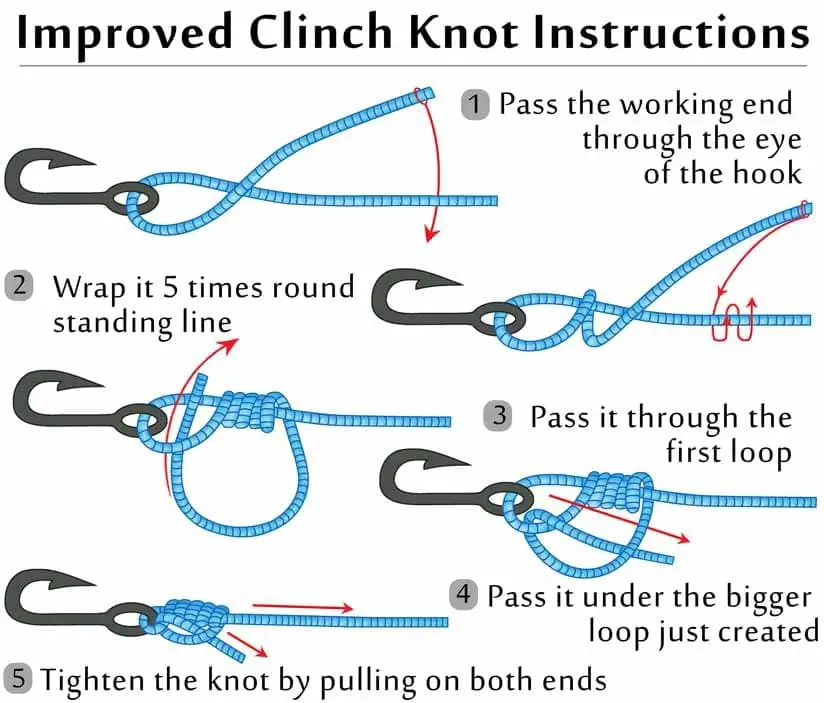
Improved clinch knot
An improved clinch knot becomes common because of its practical and durable tie. Moreover, it is versatile to tie for hook, lure, or even swivel.
Additionally, fluorocarbon or mono lines are recommended for this fishing knot type. Plus, the lines surpassing 30 pounds are inappropriate for this knot.
Now, it’s time to acquire the detailed steps to tie this knot.
- Step 1: Pass the end of the fishing line through the hook eye.
- Step 2: Pull the line out within 6 inches and wrap itself around 5-7 twists.
- Step 3: Insert the line into the formed loop above the hook’s eye and bring the big loose back. Be mind of overlapping the coils with each other.
- Step 4: Mosten and tighten the mainline and trim any extra line at the end.
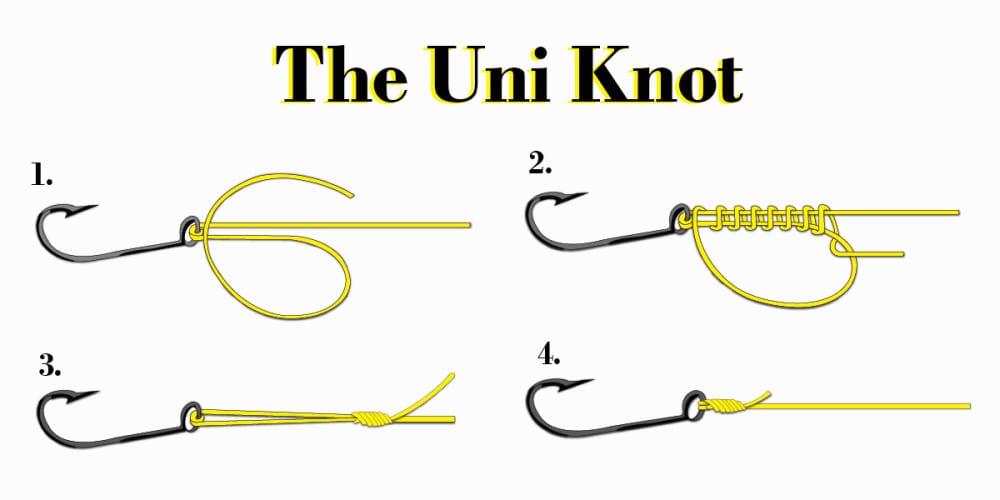
Uni knot
When it comes to a versatile fishing knot, we cannot help mentioning the Uni knot, also known as Hangman’s one.
One of the appealing factors of this fishing knot is bridging the Superline with leader material. Further, it is also ideal for typing the hook and connecting a line with a reel. Indeed, the monofilament line is applicable the most to the Uni knot.
Below are 4 easy steps to handle this knot:
- Step 1: Leave the fishing line through the eye hook and double back it in parallel.
- Step 2: Twisting the tag end around the double line with 6 turns and through the loop.
- Step 3: Lubricate and pull the mainline to tighten the turns.
- Step 4: Settle the knot down to close the eye or leave a tiny loop according to your desire.
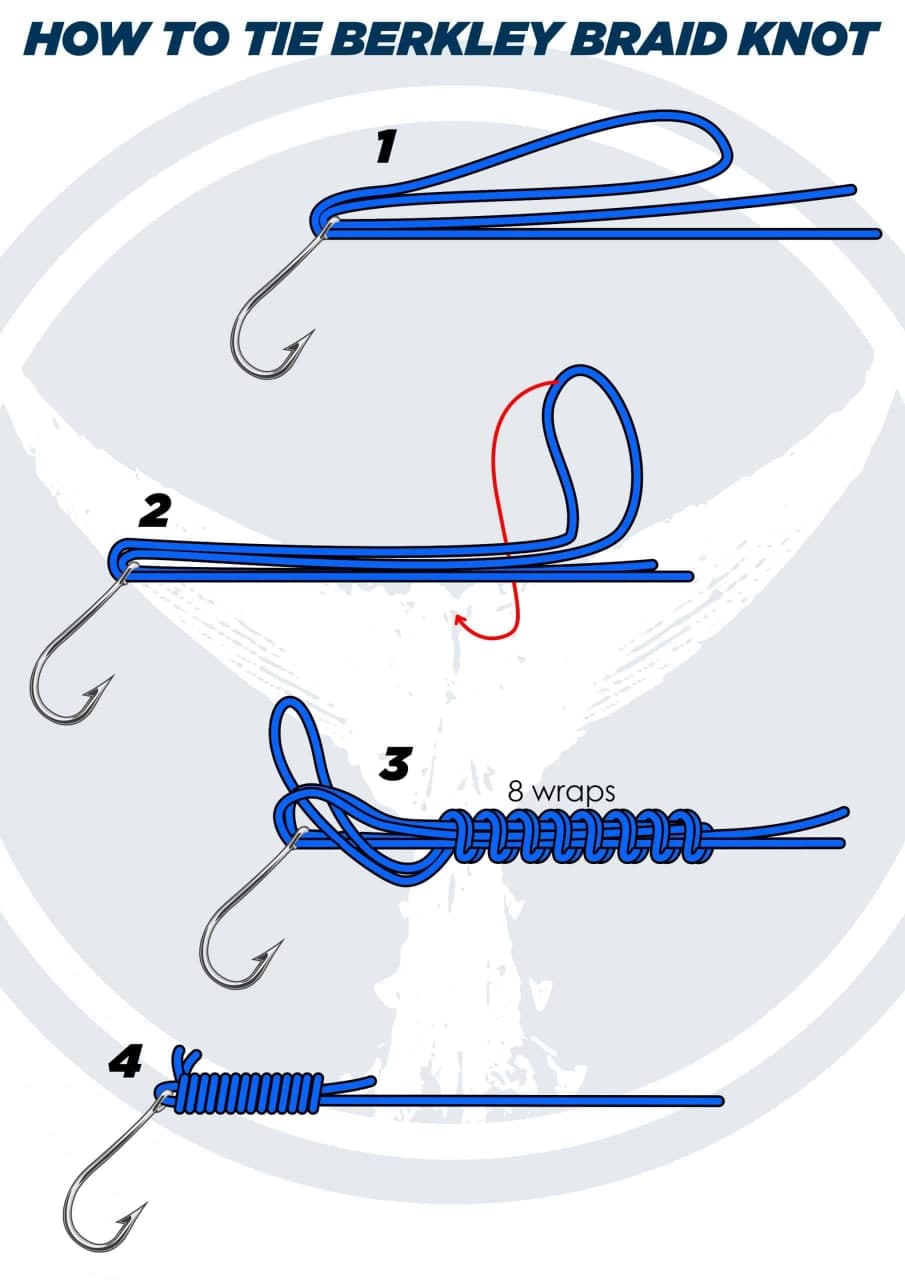
Berkley braid knot
This fishing knot is developed by Berkley, which is mainly for the braided lines. However, it is a well-rounded knot, which works for others, such as fluorocarbon and mono fishing lines. So, here is the complete guide to Berkley braid knot:
- Step 1: Pull the doubled line via the eye of the hook or lure
- Step 2: Wrap both lines up with 8 turns from the top to down
- Step 3: Insert the double loop through the space between the eyehook and coils.
- Step 4: Drag the loop, tag end while holding the main line to tighten the knot. Trim the excess.
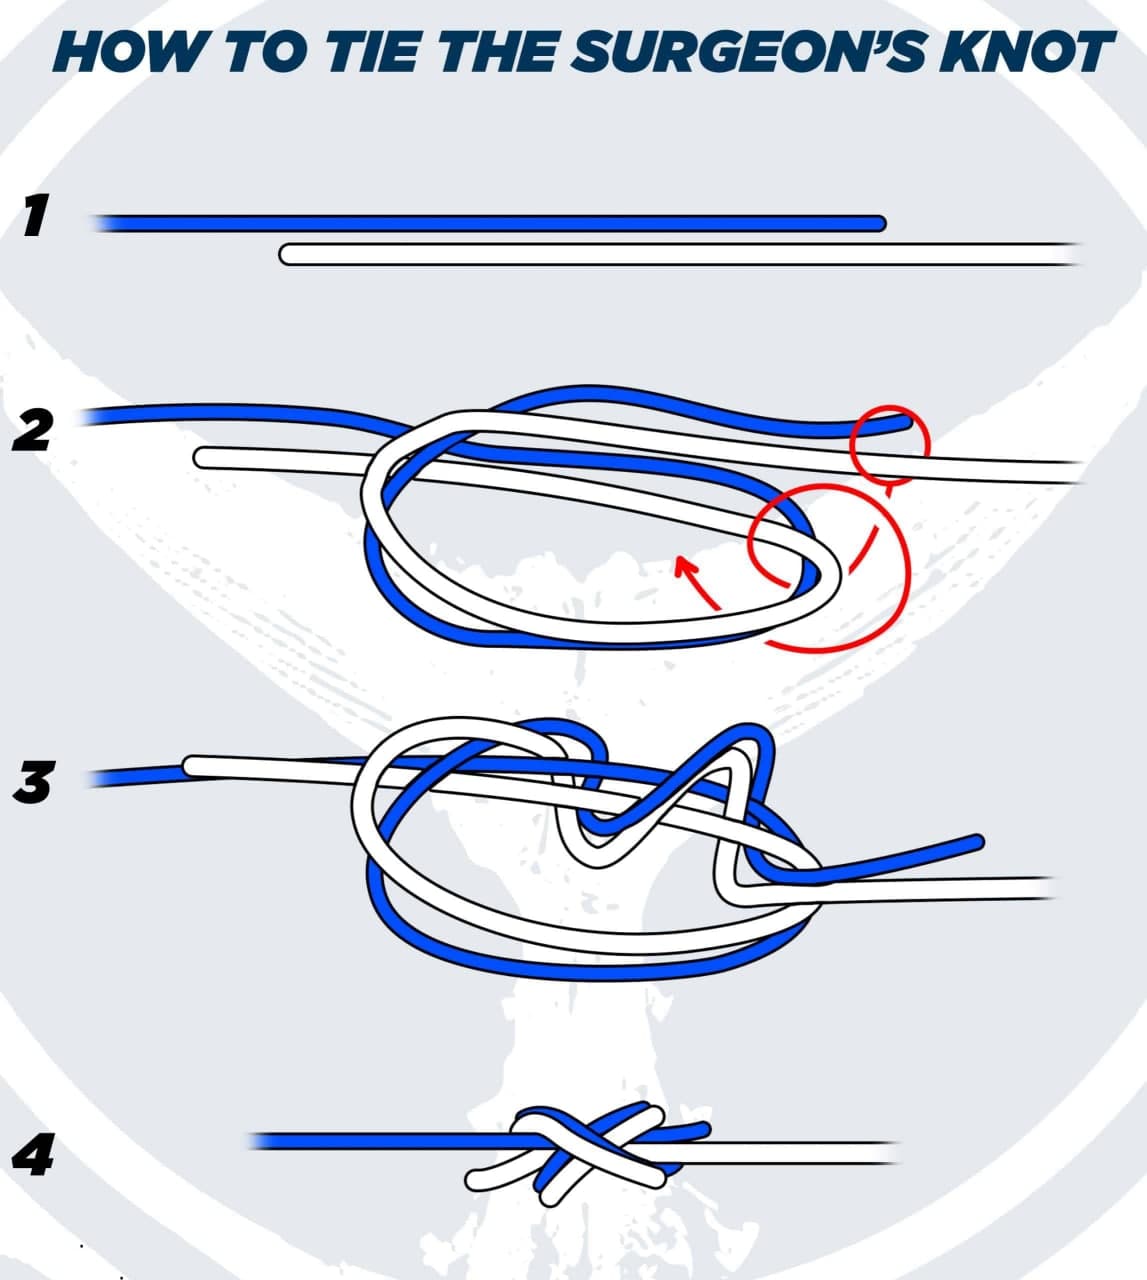
Surgeon knot
Another fascinating fishing knot is the Surgeon knot. Most anglers favor this knot in terms of being straightforward to tie. Therefore, it will come in handy if your hand is cold or tying in a dark situation.
Moreover, the Surgeon knot can reach 100% line strength given that tying properly. Indeed, you should utilize all 4 strings to tighten for the best durable and robust knot.
And following are simple steps to tie this fishing knot:
- Step 1: Overlap the leader and mainline by several inches
- Step 2: Form a basic loop
- Step 3: Pass both these lines through the loop 2 times
- Step 4: Moisten and pull the mainline on both sides to tighten the knot. Cut down the end of the excessive tags.
Conclusion
You might now grasp essential knowledge relevant to tying the fishing knot. Besides, you should first choose one fishing knot type to practice to be skillful at that method before moving to another one.
Hopefully, you find this post helpful, and don’t hesitate to share it with your friend and family. Also, if you have any further concerns, feel free to leave a message below!


